Has your bathroom design been giving you rocky moments? Switching to microcement could be the smooth transformation you need for your renovation project. Offering unparalleled design flexibility and a seamless aesthetic, microcement allows you to reimagine your space with ease, from smart layout planning to selecting the perfect finishes that complement your style and lighting. With practical advice on surface preparation, installation techniques, and maintenance, this comprehensive guide supports you every step of the way to create a modern, cohesive bathroom that stands the test of time.
Planning Your Bathroom Layout with Microcement
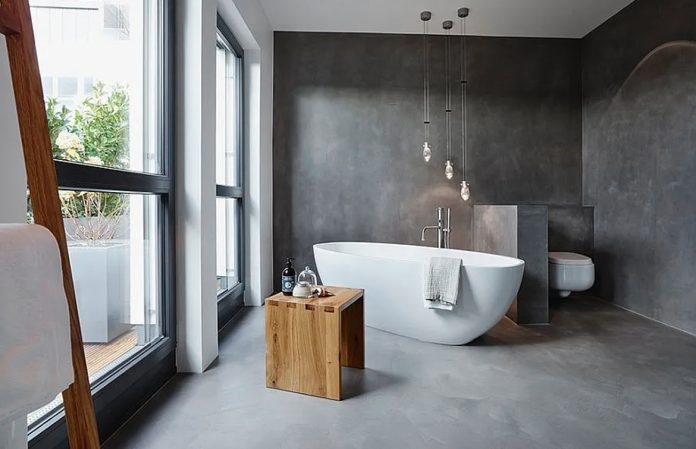
Transforming your bathroom starts with a strategic layout that leverages the unique benefits of microcement. This versatile material allows for seamless transitions between surfaces, eliminating grout lines and creating a unified, spacious feel. When designing your space, consider how microcement can be applied to floors, walls, and even countertops to achieve a cohesive and modern aesthetic.
Additionally, thoughtful planning ensures that the functionality of your bathroom is enhanced by the durability of microcement. Its water-resistant properties make it ideal for wet areas, reducing the risk of mold and mildew while maintaining an elegant appearance. By mapping out the placement of fixtures and considering the flow of movement, you can maximize both the practicality and visual appeal of your renovated bathroom.
Maximising Design Flexibility and Aesthetics with Microcement in Bathroom Layouts
Incorporating microcement into your bathroom not only elevates the aesthetic appeal but also significantly enhances design flexibility. Its seamless application allows for open and adaptable layouts, free from the constraints of traditional tiling. For instance, a compact bathroom can benefit from uninterrupted surfaces, making the space appear larger and more cohesive.
Consider these key layout considerations when planning your bathroom renovation with microcement:
- Space Optimisation: Utilize every inch efficiently by eliminating grout lines, which often disrupt the flow of a room.
- Fixture Placement: Strategically position fixtures to complement the fluidity of microcement surfaces, ensuring both functionality and style.
- Lighting Integration: Enhance the unified aesthetics by integrating lighting that highlights the smooth textures of microcement.
The advantage of unified aesthetics that microcement offers extends beyond the bathroom itself, creating a harmonious look when transitioning to adjacent areas like walk-in showers or dressing rooms. This consistency not only simplifies the overall design but also provides a timeless elegance that can adapt to various interior styles.
|
Feature |
Traditional Tiling |
Microcement |
|
Application |
Requires grout lines and individual tiles |
Applied as a continuous layer, creating seamless surfaces |
|
Design Flexibility |
Limited by tile sizes and patterns |
Highly adaptable to various shapes and layouts |
|
Maintenance |
Grout can stain and requires regular cleaning |
Easy to maintain with fewer joints |
|
Aesthetic Appeal |
Traditional look with visible lines |
Modern, sleek appearance with unified textures |
Selecting the Right Microcement Finish and Colour
Choosing the perfect microcement finish and colour scheme is pivotal for transforming your bathroom into a stylish sanctuary. Whether you prefer a matte, glossy, or textured finish, each option brings a unique character to the space, allowing you to tailor the look to your personal taste. Experts’ advice highlights the importance of considering the lighting in your bathroom, as it can significantly influence how colours and finishes appear throughout the day.
When it comes to colour selection, don’t be afraid to experiment with bold tones if you’re aiming for a standout statement. Neutral shades can create a calming environment, while vibrant hues add a touch of personality and energy. Professional consultants recommend testing samples on your walls to observe how they interact with your bathroom’s natural and artificial lighting. This hands-on approach ensures that your chosen finish and colour not only meet your aesthetic goals but also enhance the overall functionality and appeal of your renovation project.

Choosing the Right Finishes and Colours for Your Microcement Bathroom
When it comes to microcement, the variety of finishes available can dramatically transform your bathroom’s atmosphere. From sleek matte surfaces that exude modern sophistication to glossy finishes that reflect light and create a sense of spaciousness, each option offers a unique visual impact. Experts advise selecting finishes that not only complement your personal style but also enhance the functionality of the space. For instance, a matte finish can reduce glare in brightly lit bathrooms, while a high-gloss finish can make smaller bathrooms appear larger and more open.
Colour selection plays a pivotal role in setting the mood of your bathroom. Below is a simple table highlighting popular colours and the corresponding moods or styles they evoke:
|
Colour |
Mood/Style |
|
White |
Clean, Minimalist |
|
Grey |
Modern, Elegant |
|
Blue |
Calming, Spa-like |
|
Black |
Bold, Luxurious |
|
Green |
Natural, Refreshing |
Pairing these colours with typical bathroom elements can enhance the overall aesthetic. For example, combining grey microcement with white fixtures creates a timeless and sophisticated look, while blue accents can add a serene, spa-like feel. When selecting finishes and colours, consider your bathroom’s light conditions and your personal preferences. Natural light can intensify certain colours, making them appear more vibrant, whereas subdued lighting can create a cozy and intimate atmosphere. Experts recommend testing samples in your bathroom’s lighting before making a final decision to ensure the chosen finishes and colours harmonize perfectly with the space.
Ensuring Your Bathroom is Ready for Microcement Magic
Before diving into the sleek world of microcement, it’s crucial to prepare your surfaces meticulously. Start by stripping away any old tiles, adhesives, or coatings that could interfere with the microcement’s adhesion. A clean slate ensures that the microcement bonds properly, providing a durable and long-lasting finish. Ignore this step, and you might find yourself dealing with peeling or cracking sooner than you’d like.
Next, tackle any imperfections in the surface. Fill in cracks, holes, and uneven areas with a high-quality filler, then sand everything down until it’s smooth and even. This level of attention to detail not only enhances the microcement’s appearance but also prevents future issues caused by uneven application. Don’t rush this process—taking the time to get it right now saves you from headaches down the line.
Finally, apply a suitable primer designed for microcement applications. This step is non-negotiable as it creates the perfect base for the microcement to adhere to, ensuring a flawless finish. Remember, proper preparation is the key to unlocking the full potential of microcement in your bathroom renovation. Skimping on these steps might save time initially, but it compromises the quality and longevity of your beautiful new space.
Essential Steps for Preparing Your Bathroom Surface for Microcement Application
Achieving a flawless microcement finish begins with meticulous surface preparation. Neglecting this critical phase can lead to unsightly cracks and poor adhesion, undermining the longevity of your renovation. Follow these essential steps to ensure a seamless and durable application:
- Thorough Cleaning: Start by removing all existing contaminants such as dirt, grease, and old adhesives. Use a high-quality cleaner and ensure the surface is completely dry before proceeding.
- Surface Repair: Inspect the area for any cracks or holes. Use a suitable filler to repair imperfections, creating a smooth and even base for the microcement.
- Priming: Apply a specialized primer to enhance adhesion. This step is crucial for preventing future peeling or flaking of the microcement layer.
- Moisture Barrier Installation: In bathroom environments, moisture is a constant challenge. Installing a moisture barrier will protect the microcement from water damage and ensure its durability.
One common challenge during preparation is dealing with uneven surfaces. To overcome this, use a self-leveling compound to create a flat and uniform base. Additionally, ensuring adequate ventilation during the drying process can prevent mold and mildew growth, which are detrimental to both the surface and the overall bathroom environment.
For instance, in a recent renovation project, a homeowner faced persistent issues with surface unevenness and moisture. By meticulously following the preparation steps—cleaning, repairing, priming, and installing a moisture barrier—the team successfully applied microcement that not only enhanced the bathroom’s aesthetics but also withstood the high-humidity conditions without any signs of deterioration.
Remember, investing time and effort into proper surface preparation is non-negotiable. It lays the foundation for a stunning and long-lasting microcement finish, transforming your bathroom into a modern and resilient space.
Installing Microcement: Tips and Techniques
Transforming your bathroom with microcement is a savvy choice that blends sleek aesthetics with durable functionality. To ensure a flawless finish, it’s crucial to prepare the surface meticulously. Start by removing any existing coatings and repairing imperfections to create a smooth base. Experts recommend using a high-quality primer to enhance adhesion, which is pivotal for the longevity of your microcement application.
When it comes to application techniques, consistency is key. Applying multiple thin layers rather than one thick coat prevents cracking and ensures a seamless appearance. Utilize the right tools, such as a trowel or spatula, to evenly spread the microcement. Additionally, controlling the working environment by maintaining optimal temperature and humidity levels can significantly impact the outcome. As seasoned professionals advise, patience and precision during each step will result in a stunning, resilient bathroom surface.
Applying Microcement in Wet Environments: Best Practices, Installation Steps, Finishing Techniques, and Essential Tools
Transforming your bathroom with microcement demands adherence to specific best practices to ensure durability in wet conditions. Start by thoroughly preparing the surface to eliminate any moisture barriers that could compromise the finish. Utilizing high-quality waterproof sealants is crucial to prevent water ingress and mould growth. Maintaining the right environmental conditions during application, such as controlled humidity and temperature, will significantly enhance the longevity of your microcement installation.
The installation process involves several meticulous steps. Begin with applying a primer to the prepared surface, followed by layering the microcement in thin, even coats. Each layer should be allowed to dry completely before applying the next to achieve a seamless finish. For different textures and finishes, techniques like troweling, sponging, or even spraying can be employed. These methods allow for creative flexibility, enabling you to customise the aesthetic to match your bathroom’s design.
Having the right tools and materials is essential for a smooth installation. Equip yourself with quality trowels, mixing buckets, and protective gear to ensure safety and precision. Additionally, selecting the appropriate microcement products and sealants tailored for wet environments will streamline the process and result in a professional-grade finish. By following these guidelines, you can achieve a stunning and resilient microcement bathroom that stands the test of time.

Maintaining and Cleaning Your Microcement Bathroom
Keeping your microcement bathroom in top condition requires regular cleaning and mindful maintenance. Use a soft cloth or a non-abrasive sponge with mild, pH-neutral cleaners to gently wipe down surfaces. Harsh chemicals and abrasive materials can damage the microcement finish, so it’s best to avoid them. Establishing a consistent cleaning routine not only preserves the beauty of your bathroom but also ensures the longevity of the microcement application.
Beyond daily upkeep, implementing preventative measures is crucial for maintaining the integrity of your microcement surfaces. After each use, consider using a squeegee to remove excess water from walls and floors, which helps prevent water spots and potential damage. Ensuring proper ventilation in your bathroom minimizes moisture buildup, safeguarding the waterproofing properties of the microcement. Additionally, periodic inspections can help identify and address minor issues before they escalate.
Periodically applying a high-quality sealer will enhance the waterproofing and protect against stains and abrasions, keeping your microcement surfaces looking fresh and resilient. If you notice any signs of wear or minor damages, it’s advisable to consult a professional for repairs to maintain the seamless appearance of your bathroom. With proper care and maintenance, your microcement bathroom will remain a stylish and durable feature of your home for many years.
Essential Maintenance Strategies for Your Microcement Bathroom
Keeping your microcement bathroom in top condition doesn’t have to be a hassle. With the right maintenance routines, you can ensure your space remains both stunning and durable. Here are some practical steps to help you maintain its flawless appearance:
- Recommended Cleaning Products: Opt for pH-neutral cleaners specifically formulated for microcement surfaces. Avoid harsh chemicals that can erode the finish.
- Cleaning Methods: Use a soft microfiber cloth or sponge for daily cleaning. For tougher stains, a mild abrasive pad can be effective without scratching the surface.
- Preventing Stains and Damage: Immediately wipe up spills to prevent staining. Install shower screens to reduce water splashes and use bath mats to absorb excess moisture.
Adopting these long-term care practices will significantly extend the lifespan of your microcement bathroom. Regularly inspect seams and edges for any signs of wear, and reapply a sealant every 12-18 months to maintain its resistance against moisture and stains. By prioritising these maintenance strategies, your bathroom will continue to showcase its sleek, modern aesthetic for years to come.


